Archives

Release the Piecaken!

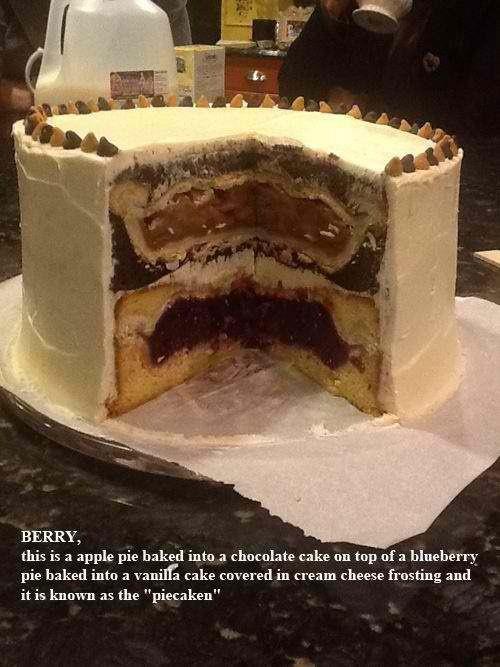
Some of you may have seen this picture I posted on Facebook last week:

Who knew it would cause such a fuss!  You guys flipped over it!

A friend sent me this picture (I did not make this or take the photo), and I thought it was too crazy not to be shared.  Amazing the strong reactions on both sides that this over-the-top dessert stirred up!  This, my friends, is PIECAKEN.  The sugary version of turducken.  Pie baked into a cake.  Amazing to some.  Horrifying to others.  But regardless of your position of it, piecaken did create quite the stir.

I received 7 emails from people wanting me to make this for them.  One request in particular really got my attention.  It was from a soldier in Afghanistan asking if I could make one and send it to him and his troop because the food they eat there is far from  yummy.  After much research, I learned that this would not make the trip.  But how do I ignore such a request from the soldiers who were dedicating their lives to protecting my freedom to make such a dessert?  And on Memorial Day, nonetheless.  So what’s a baker to do?

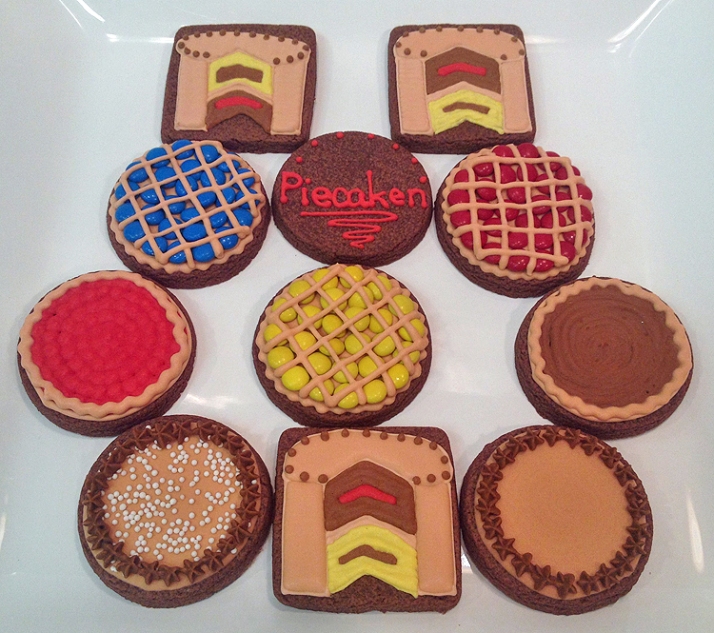
Make them in cookie form, of course!  Along with more pie and cake!

Can you see it?

And because my friend Melissa at The Baked Equation is so awesome, she jumped in and baked with me.  She made the most AWESOME Mexican Chocolate Cookies (with cayenne pepper in them!), as well as chocolate chip, butterscotch and margarita lime!  (I know, right?!)

Here they are, all packed up and ready for their trip around the world.  (And we ended up with so many it took 2 boxes to get them there!  Thanks again, Melissa!)

So while I was bummed that I couldn’t ship them an actual piecaken, I hope Jerry and the 66 soldiers in his troop enjoy a more shippable version.

Oh, and I will so be making my own version of the real thing.  But my girls have decided I need to use a chocolate pie, and maybe an oreo cookie pie instead.  No fruit in our sugar coma fest!

Want to make one, too?  Here is the recipe (posted by For The Love Of Food).  I didn’t create it.  I’m not exactly certain who did.  If you know for certain, post a comment so I can give proper credit, because this genius deserves the recognition due!

This is the “quick” version.  You can make any or all of this from scratch.

PIECAKEN

  • Two 9″ round cake pans that are 3 inches deep
  • 2 cake box mixes and the ingredients the box calls for (your choice of flavors)
  • 2 pre-cooked 6-inch pies (your choice of flavors)
  • Buttercream icing (double batch or 2 tubs of store bought)

Take one box cake and make the batter according to instructions.  Pour half the batter in a 9” round cake pan. On top of that, put the first pie. Pour the rest of the cake batter on top of that and bake it according to the box instructions.

Take the next box cake mix and make the batter according to instructions on the back of the box. Pour half the batter in a 9” cake pan. On top of that, put your second pie. Pour the rest of the cake batter on top of that and bake it according to the box instructions.

Once both cakes are done, wait until they cool and then assemble and decorate cake as normal.

*********************************************************************************************

So there you have it.

Whether you find piecaken incredible or disturbing, I hope your week is sweet!

Game Night!

I was invited by Nicole at Sugar & Stitches to take part in a Game Night cookie fest with a wonderful and talented group of ladies.  I was so excited just to be included with such an great group of cookiers!

When trying to decide which board game to do, I asked my 7-year-old daughter.  She, of course, immediately said Candyland.  Sure, I thought.  That would be fun.  Lots of colors.  I can use sparkles! It will be great!  So I sent my selection off to Nicole and all was well.

Until, of course, I actually took the game board out to look at it when it was time to do the cookies.  LESSON LEARNED: Don’t take cookie advice from a 7-year-old.

But at the end of the day, they were (hair-pulling-out) fun, and I once again got to use sparkles!  And lots of them.  So how can that be bad, right?

Lolly!  Juggling gumdrops.  Don’t we all wish we could?

Princess Lolly.  I have a crown just like this.  I just wear mine on special occasions.

Queen Frostine.  I think I’ve been called that a time or two in my life.

This is Mr. Mint.  He suffered a tragic Royal icing transfer removal incident.  It required extensive surgery.

And you gotta have the little gingerbread game piece guys.  These shorts would never meet dress code at out school.  Just sayin’.

Here are all of the players in our Game Night.  Check out these AWESOME cookies!!

  1. LIFE and Jenga by Nicole, Sugar & Stitches
  2. Skip-Bo by Cassie, Creations by Cassie
  3. Candyland by Tara, The Shaky Baker
  4. Card Games by Cristin, Cristin’s Cookies
  5. Magic: The Gathering by Jennifer, Not Your Momma’s Cookie
  6. Mouse Trap by Sherrene, The Sugar Tree
  7. Trivial Pursuit by Heather, Twins Plus One Goodies

Thank you again Nicole for including me in the fun! (Sorry I was so late =)

I hope you enjoyed our cookie party.  May the rest of your week be sweet!

PS.  Please forgive the stellar photography.  Long story.  =)

May the Fourth be with you

Hi.  My name is Tara.  And I’m a Star Wars fanatic.


I have been a fan since I was a kid.  I could play the Empire Theme on piano and clarinet by the time I was 9.  (Not both instruments at the same time, of course).

As a twisted fate by the universe, I married a Star TREK fan.  (I know.  I know.) I try not to hold that against him.  The worst Star Wars movie (and we all know that’s Episode I.  Sorry, George) is 10x times better than the BEST Star Trek movie (is that an oxymoron?).  Just stating fact.

So I love this day to honor the real #1 Sci Fi space series.  Admit it, you must.

So HAPPY STAR WARS DAY!

May the Fourth be with you!


The next “big thing”

GIVEAWAY IS CLOSED!

*******************************************************************************

And the winners are……….

If you are one of the winners, please email me at tara@theshakybaker.com with your mailing address so I can get these mailed out to you!

I will keep checking my stores for more.  If I find more, I’ll share those, too.  =)

Thank you to everyone who left a comment!  Hope your weekend is sweet!

*******************************************************************************

So, did you know that these are the new rage in cookie decorating?

Thanks to Callye at Sweet SugarBelle they are.

These babies make the best icing bag holders.  The BEST.  And for $1, you can’t beat the price.  (Sorry, Wilton).

Problem is, they seem to be selling out everywhere before bakers can buy them.  But lucky for you guys, I live in a small town where people here don’t know the wonders of the $1 popcycle maker.  So I went down today and cleaned out the shelf.  Bought every one they had.  The cashier thought I’d lost my mind.  If only she knew how right she was.

Now, I need to share them with you.  Want one?

I am going to send 2 packs to four (4) different people.  INTERNATIONAL INCLUDED!!  If you want them, just leave a comment ON THIS POST.  I will randomly select four people to win.  Simple as that.

But ya gotta act fast. I’m going to mail them out this Friday, so I’m only leaving it open until Thursday, May 3rd (yes, tomorrow!) until 9pm CST.  Then I will draw 4 winners and drop them in the mail.  I have to act fast, because you really need these.  Your cookies could depend on it.

Make sure you leave contact information so I can get in touch with you if you win!

Good luck!  And I hope the rest of your week is sweet!

I would eat them in a box.

I have always been a huge Dr. Seuss fan.  Especially now that I am a mom of 3 kids.  I have had such joy over the years watching my kids learn to read his books.  And what fun we’ve had with the tongue twisters!

So in honor of his birthday, for my 6yo’s class at school, I made green eggs and ham.

The kind that I would eat.  Chocolate, covered in icing.

Yes, Sam.  I do like them.

I hope you have a Seussy day!


It’s all about the children.

I love children.  I have three of them.  I work at the nursery at church on Sunday.  I have taught Sunday school for 5th grade.  I am co-room mom for both of my girls’ classes at school.  I just love kids.

That being said, this week’s project has given me a whole new perspective on them.  I could have 30 of these kids!

And by “have” I mean enjoy them with coffee.  And I don’t mean let them sit and have coffee with me.  I mean have them WITH my coffee.  Literally. (and this picture quickly comes to mind….)

See how happy he looks?  I love making children happy.

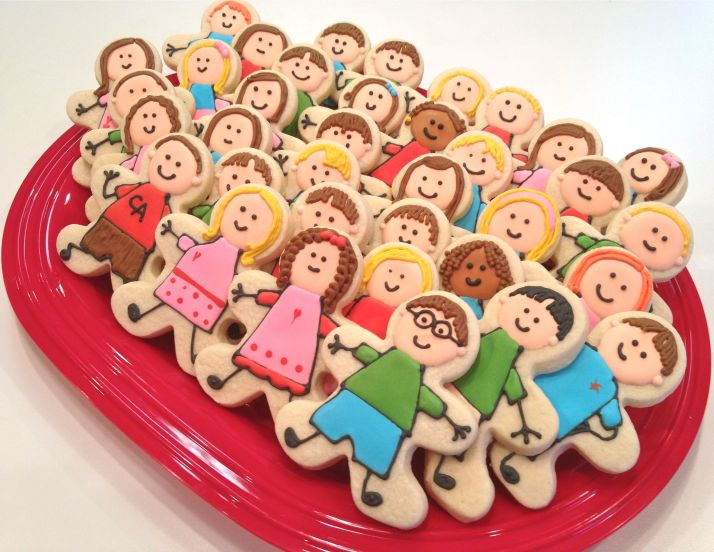
This week, I was asked to make cookies for a silent auction fundraiser for my kids’ school.  The item for the 1st grade (my youngest’s age) is a cookie jar with their thumb prints and names on it.  How fun, right?  And a cookie jar needs cookies, so that’s where I come in.

We came up with the idea to do a cookie representation for each kid in the 1st grade.  So I went by their school pictures and made a cookie look like each of them.  It was a blast putting their little personalities on a cookie!

If only all class pictures were this easy to take.

Look at how well behaved they are!

This is one of my daughter’s BFF’s.  Love her little curls!

Say “CHEESE!”

My daughter is the one with the blue hair bow, in the second-to-the-last row.  I put her towards the back because she is the second shortest in the entire grade, so she is always in the front row.  This is the only way that she gets to stand in the back.  (Yep, my Mother of the Year application has already been filed.)

As is expected with children, this was not the quickest project I’ve ever done.  Lots of colors (12, to be exact) and lots of small details.  (Not everyone parts their hair on the same side, ya know). But I think it was one of my all-time favorite cookie experiences.

My daughter is a little disappointed that she isn’t going to get to eat “her” cookie.  She asked if I would please win the auction so that she could.  “Yes, sweetheart.  I’ll pay lots of money to buy the cookies that I made for free so that you can eat one of them.”

As if.

If you ever need a fun idea for a school cookie project, I highly recommend this one.  Everyone is getting a kick out of seeing their kid as a cookie and trying to figure out who everyone is.  And it will give the teachers an opportunity to see what their class actually looks like quietly standing still.

And that, my friends, is a gift.

Hope the rest of your week is sweet!

You can teach an old dog new tricks.

Yesterday, my kids celebrated the “100th Day of School.”  So for me, that means cookies!  What better way to celebrate, right?

I made “100” cookies for my daughter’s 1st grade class.  I also took this as an opportunity to try out some new tricks.

When I posted my “Top 14 things I learned in 2011” post, several of you commented about using the “plastic wrap around the icing inside the piping bag” trick.  I will admit that was one I hadn’t tried yet, even though I had seen several serious “cookiers” post they did this.  So, I thought this would be the perfect time to try it out.

For those not familiar with this trick, it’s pretty straight forward.  Just lay out some plastic wrap.  Scoop your icing into the middle of it.  Scoop more than you think.  My first round ended up being a very small piping bag because it holds more than I thought.

Then fold over one side until it grabs onto the other side.

Fold the other side over, then twist the ends in opposite directions to seal it.  Like a piece of candy!

Then just feed one end into the bag and through the coupler.  (I found this to be the most difficult part.  I ended up rolling down the bag to make it easier to get to the coupler).

I even decided to try it with my thick flood icing (20-second). (The above pictures are with this icing).  I find it quite a pain to get it in the squeeze bottles because it’s so thick.  A funnel is always involved.  So I was curious if this would work for that as well.

It worked out great!  I was able to fill the bag with as much icing as would normally fill one large squeeze bottle.

I also found that my icing didn’t separate as quickly as it normally does in a squeeze bottle.  Not sure why.  I’ll have to play around with this more to see if that continues to happen.  (Which would be a good thing, mind you).

The next thing I tried was using dowels to roll out my cookie dough.

I have a confession.  I don’t normally measure the thickness of my dough.  Ever.  I roll it until it “feels” right.  But I have found that my cookies can sometimes be uneven (one cookie thicker than another) and even different thicknesses within one cookie.  Both of those = bad for me.  I’m not a huge fan of the rings on the roller, and I couldn’t track down the dough board that everyone seems to love (ans it’s quite pricey), so I thought I’d start with the $.75 option.  What did I have to lose?  (Other than $.75).

I went with 1/4 inch.  Then I just rolled like I normally do.  Parchment paper, dough (with dowels on either side), more parchment.

After rolling it out for the first time, I realized one very startling thing.  I thought I knew how thick a 1/4 of an inch was, but after seeing my dough REALLY that thickness, I realized I was quite wrong.  It is WAY thicker than I thought.

So I think I’ve been rolling my dough more like an 1/8 of an inch, which after making these at 1/4 of an inch, I now think is too thin.  But, you do get fewer cookies out of a batch (obviously).

(Can you tell my 4th grader is learning fractions?  They are all over the place!)

So if you are currently eyeballing your dough thickness, I recommend spending the $1 and buying to dowels.  Curious if you will be as surprised as I was.

Our school colors are red and blue, but since there are lots of girls in the class, and it’s close to Valentine’s day, I threw in some pink.  Because I made the cookies and I can.

Both of these techniques are ones I will continue to use.  The plastic wrap made things MUCH easier, and the dowels made for nice, thick, even cookies.  Try these if you haven’t before and maybe you’ll add them to your list of tricks, too.

Happy baking!

It finally happened.

Hi.  My name is Tara.  And I am an Angry Birds addict.

I have all 3 aps.  3 stars in all of them.  I know, I know.  But I need something to do while waiting in carline to pick up the kids, right?

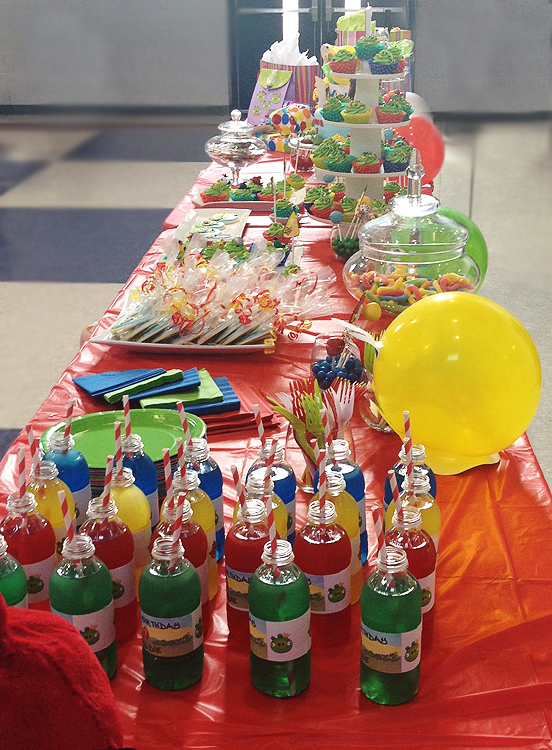
I have been dreaming of Angry Birds in sugary configurations for over a year now, but I’ve just never had the opportunity to make them.  So when a friend called and said that she was throwing a first-ever party for her 7-year-old daughter, an Angry Birds party, I was ready.  And when she said she wanted to “go nuts”, my heart about stopped.

So go nuts we did.

**DISCLAIMER: Please forgive the background.  There was only so much I could do with the table in the middle of a multi-purpose room.

First was the cake.  I could make these little fondant figures all day long.  The perfect outlet for my OCD.

And we couldn’t forget the GOLDEN EGG!

Next were the cookies.  They ended up taking longer than I had expected.  The pigs were ok, the the birds were quite pesky.  After about 8 or 10, I ended up completely starting over because I wasn’t happy with the way they were turning out.  I’m glad I did, though, because these look much better than the first found.

And since we were using them for the goodie bags, they were all wrapped up and ready to go!

She decided not to eat the cake at the party, but to save that for her actual birthday.  So we did a cupcake tower for all the kids to eat there.

She bought some plastic toppers, but there weren’t enough for everyone, so we just used them as filler.

And the birthday girl (who is my youngest daughter’s BFF) has been harassing asking me to make Angry Birds cake pops for almost a year, so those were a must.

For extra decorations, we used apothecary jars and tumblers filled with gum balls, rock candy sticks (which I sprayed with Wilton sprays to get the nice, bright colors), gummy worms and twirl suckers.  I also made some extra royal icing birds and pigs, and those looked super cute on a stick!

For the drinks, we used different flavors of Kool-aid in mini water bottles.  Custom labels and striped straws finished off the look!

She made the cutest decorations.  Birds & pigs out of balloons with faces!  Too cute!  And I forgot to take a picture of the centerpieces.  They were these fabulous nests with golden eggs and a stuffed angry bird (of which she had MANY) in the middle.  It was darling.

We were both happy with the way everything turned out.

And I’ve gotten my Angry Bird fix for a LONG time.

Well, at least in edible form.  Bring on the updates.

Top 14 Things I Learned in 2011

2011 has been an interesting year.  Good and challenging, all mixed together.

I started blogging, hanging out more on Twitter, and even finally landed on Facebook.  And since doing so, I have met so many wonderful people that are willing to share their gifts and love of baking and decorating, making sugar as tasty and beautiful as possible.  I am thankful to be part of such a wonderful community.

I am also ashamed to be so slack on doing my part.  So I have vowed to blog (at least) once a week this year.  52 posts.  Surely I can do that.

What better way than to start January 1 off with a post!  And what better post than to share all the wonderful tips and tricks I’ve learned this year, and to say thank you to those willing to share their secrets and talents.  I couldn’t narrow it down to 10, so 14 it is.

DRUM ROLL PLEASE……..

14.  I began my decorating ala Wilton at Hobby Lobby.  Everything I did was in a Wilton disposable icing bag.  Imagine my surprise to see cookie decorators using squeeze bottles.  So great for flood icing. These have ended up being my favorites:

The larger 8oz size (I bought many from Karen’s Cookies)

And the smaller 2oz size (not the tips.  They are awful):

13.  I also learned that you don’t have to use fancy glass Pyrex bowls to mix icing.  I use these awesome small plastic bowls from the $1 section at Target.  They are flexible, which makes for easy mixing and scraping down the sides.  And at $.25 a bowl, you can’t beat the price.  They are perfect for dipping cake pops w/chocolate, too.  (Thank you, Bakerella, for showing me the light.)

12.  Toothpicks.  Who would have ever thought they could be such a valuable tool.  They are great for popping bubbles, making a smooth horizon icing line, sneaking icing to the edge, moving sprinkles, plugging tips to keep icing from drying out,…the list goes on and on.  Couldn’t live without them.

11.  Along the same line, I have found great love for my giant safety pin.  It is my premium bubble popper.  My favorite tool for marbeling.  For some things, I love it more than toothpicks.  (Yes, it’s true).

10.  This year has been eye-opening for me with regards to taste, as well.  I’ve experimented with different extracts and gotten some wonderful flavors.  (I love lemon & vanilla in my sugar cookies).  I’ve also learned about Emulsions.  SweetSugarBelle and Bake at 350 were the first I saw talk about them.  My favorite is this one:

It has a wonderful nutty flavor.  It has no alcohol, is kosher certifited, sugar and gluten free.  And it tastes yummy, too!  The exchange for extracts the same, but don’t bake out as much, leaving a more robust flavor.  TJ Maxx and Ross are great places to find them at cheap prices!

9.  For a while, I tried placing all of my sprinkles and candies on my treats by hand.  Then one day, I was a few dollars short in an order to get the free shipping (admit it.  You know you’ve done it) so I threw in a pair of tweezers that were on special.  One of my best purchases.  These are the ones I have, and I adore them.  They will grab and hold on to the smallest of sprinkle.

8.  The heat gun.  A relatively new tool that I have learned about.  Flour Box Bakery is the one who started the craze.  It has taken some experimenting (too much heat will crack outlines, fyi) but I think this is going to be a great long-term tool since I live in such a humid climate.  This is the one I have.  Bought it at Walmart for $20.

7.  I also learned about the wonders of vinegar.  Up until last year, I think I had the same bottle in my panty for the past 13 years.  Now, I go through gallons.  I use it to replace fabric softener.  Great for stains and de-stinking the sink.  But I also found that it is royal icing’s best friend.  Before I make icing, I wipe EVERYTHING that is going to come in contact with my icing down with vinegar.  The mixing bowl, beater, bowls, spatulas,…you name it.  It has completely removed the issue of any oil/grease getting to my royal icing.  Since I’ve started using it, I have had zero issues with my icing.  Who knew something that smelled so awful could be so magical.

6.  Again, being from the Wilton school of thought, I just assumed you had to use the Wilton gel colors.  Then AmeriColor came into my life.  Such vibrant colors.  Easier to use.  No taste.  I switched all of my colors, donated my Wilton colors to a local girl scout troop and never looked back.  (Sorry, Wilton).  AmeriColor gels are your friend.

5.  I’ve never been a huge fan of the taste of royal icing.  Very sweet with a bitter after taste.  Then, thanks to Sweetopia and Bake at 350, I learned that was largely the fault of the meringue powder.  Wilton brand is the only kind sold in my small town hobby store, and since that is what they pushed at the Wilton class, that is what I used.  But thanks to these wonderful ladies, I learned that Ateco is the way to go.  And WHAT A DIFFERENCE it makes in the taste!  Yes, I have to buy it online.  But it is worth 10-times what I have to pay for it.  Thank you, ladies,  for showing me the light.

4.  Icing tips.  I was scared of anything smaller than a 2.  I used a 3 whenever possible.  Then, I heard someone talk about “PME OO” tips.  Double zero??  Are you kidding me?  Surely no one is insane enough for that kind of madness.  And at $4.50 a pop?  My Wilton babies cost $.99.  (Ah, to be so naive).  So I decided to try one of these magic tips.  I bought a 1.5.  I filled a bag, squeezed, and….out came smooth, curl-free lines!  I was stunned.  How could this be?  Could the icing tip really make that much of a difference?  The answer, simply, is YES! I am slowly working to replace all of my Wilton 1-5 tips (Sorry again, Wilton).  The difference in my piping improved instantly simply by switching to these tips. (and they don’t discolor when you accidentally leave them soaking in water overnight because you forgot to clean them before you went to bed.  Not that I’m speaking from experience or anything.)  I have since even purchased (and used) a PME O.  I haven’t gotten brave enough for the OO.  Maybe in 2012.

3.  Flood icing.  It brought me great stress when I first started decorating cookies.  Was it too thin?  What is “syrup” or “gel” consistency, anyways? I mean, if my flood icing wasn’t the perfect consistency my cookies were doomed!  So, maybe I tend to get a little dramatic, but this is cookies we are talking about.  Then I learned 8-10 seconds when you drag a knife through it.  Ok, I could do that.  But I still had mishaps with my icing running over the edge if I didn’t pipe a line first (which I didn’t always want).  Then Callye (once again) showed me the light.  20 second icing.  What??  But that breaks all the rules!  Could it be true??  Could it be possible?  So I tried it.  And a miracle happened in my kitchen.  With 20-second icing, I had such control over the icing.  And it gave such a great “poofy” effect.  It was very freeing, and now I almost never go thinner than 20 seconds. (In fact once, I went to 30 second icing!  I know, I know.)  If you haven’t tried making 20-second icing, do it.  Today.  You will love it.  Or your money back!  No, wait.

2.  I bake everything out of my home kitchen.  And while it’s a decent sized kitchen with pretty good counter space, when I started decorating cookies, that counter space went fast!  There were baking sheets and cooling racks everywhere.  Then, I read this.  (Thank you, Callye @ SweetSugarBelle). I know she was talking about a fan, but when I saw the baking sheet rack in the background, it was a huge light bulb moment for me.  They can be a little pricey, but after some research, I found one for a great price, and it has been my best friend ever since.  (I love it so much, it has its own post.)

and the #1 tip that I learned this year is…………

A squirt bottle.

Yep, you read that right.  A plain, $.99 squirt bottle. But oh, the magic it possesses.  (Besides squirting kids and cats).  It is the PERFECT tool for thinning royal icing to flood icing.  Instead of having to go back and forth to the sink, trying to get the right amount of water to drip out of the facet, now I just stand at my decorating counter and spray the perfect amount of lightly misted wated each and every time.  I’ve learned that 12 sprays will give me perfect flood icing every time.  Such a time saver, and no more stress about getting too much water and over-thinning my icing.  This life-altering tip was learned through Callye @ SweetSugarBelle’s (if you don’t stalk read her, you need to.  She’s a WEALTH of information!) and she learned the trick from Gail of One Tough Cookie. Thank you, Gail & Callye!!!

So there you have it.  The new tricks and tools I’ve learned about this year that have changed the way I bake and decorate.  If you don’t use some of these, give them a try.  And feel free to post any of your on tips.  I’m always looking for new ones!

HAPPY NEW YEAR, and may 2012 be an extra sweet one for you and your family!